# Set up the Jira issue data
issue_data = {
    "fields": {
        "project":
        {
            "key": "YOUR_PROJECT_KEY"
        },
        "summary": "YOUR_SUMMARY",
        "description": "YOUR_DESCRIPTION",
        "issuetype": {
            "name": "Story"
        }
    }
}

# Convert the issue data to JSON format
json_data = json.dumps(issue_data)

# Set up the HTTP request headers
headers = {
    'Content-Type': 'application/json'
}

# Set up the HTTP basic authentication
auth = (username, password)

# Send the HTTP POST request to create the issue
response = requests.post(url, data=json_data, headers=headers, auth=auth)

# Check if the request was successful
if response.status_code == 201:
    return "Jira issue created successfully"
else:
    return "Error creating Jira issue: " + response.text
Replace the following variables in the code with your own Jira project key, issue summary, and issue description:
YOUR_PROJECT_KEY: The key of the Jira project where you want to create the new story.
YOUR_SUMMARY: The summary or title of the new story.
YOUR_DESCRIPTION: The description of the new story.
Deploy the Lambda function to AWS.
Test the function by triggering it with an event, such as a test event in the AWS Lambda console. If everything is set up correctly, the function should create a new Jira story with the specified details.
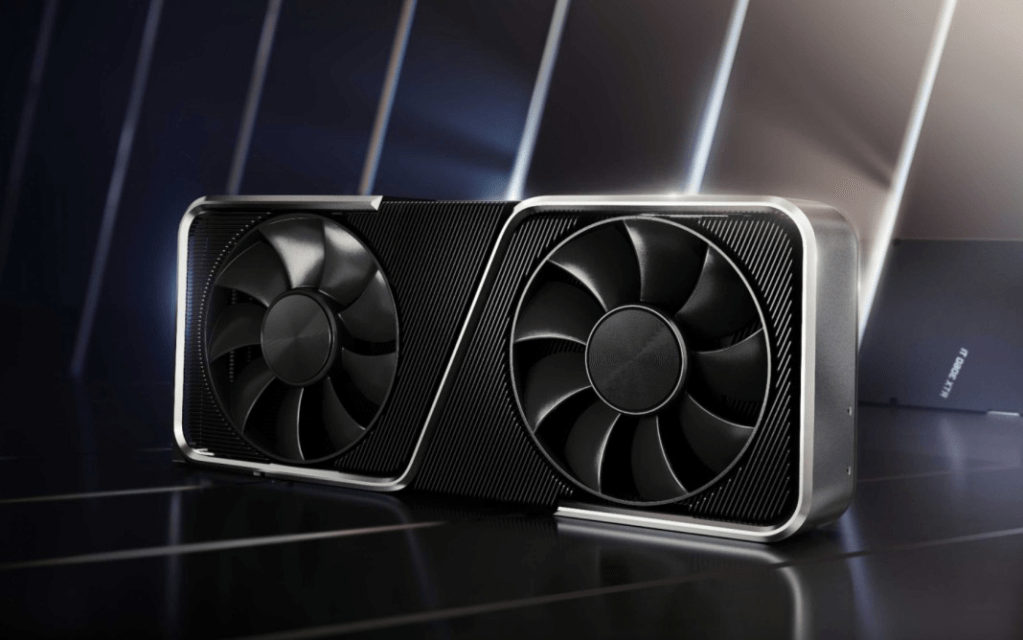
THE GRAPHICS CARD’S LIST IS SORTED AS FROM THE HIGH TO THE LOW SPECIFICATIONS.
1. NVIDIA GEFORCE RTX 3090
The Nvidia GeForce RTX 3090 is high-end desktop graphics card based on the Ampere generation. It uses the big GA102 chip and offers 10,496 shaders and 24 GB GDDR6X graphics memory. Compared to the slower RTX 3080, the 3090 offers 10 – 20% higher gaming performance, but only above 4k. Still it has not enough power for 8k gaming at maximum detail settings. The RTX3090 is rated at 350 Watt but the power efficiency is still quite good.
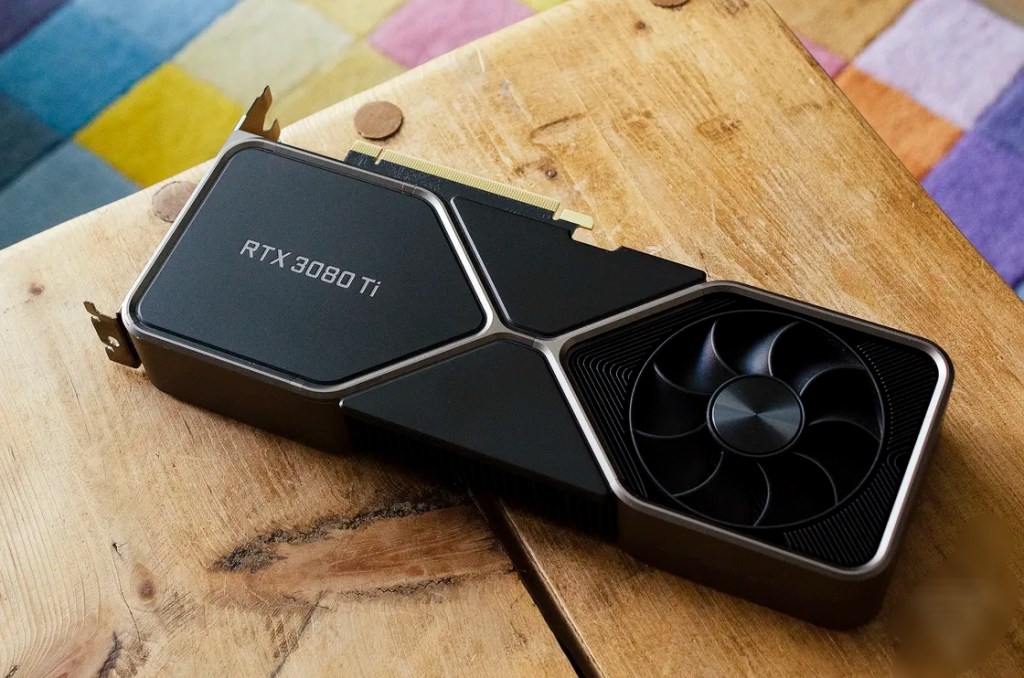
2. NVIDIA GEFORCE RTX 3080TI
The GeForce RTX 3080 Ti is an enthusiast-class graphics card by NVIDIA, launched on May 31st, 2021. Built on the 8 nm process, and based on the GA102 graphics processor, in its GA102-225-A1 variant, the card supports DirectX 12 Ultimate. This ensures that all modern games will run on GeForce RTX 3080 Ti. Additionally, the DirectX 12 Ultimate capability guarantees support for hardware-raytracing, variable-rate shading and more, in upcoming video games. The GA102 graphics processor is a large chip with a die area of 628 mm² and 28,300 million transistors. Unlike the fully unlocked GeForce RTX 3090 Ti, which uses the same GPU but has all 10752 shaders enabled, NVIDIA has disabled some shading units on the GeForce RTX 3080 Ti to reach the product’s target shader count. It features 10240 shading units, 320 texture mapping units, and 112 ROPs. Also included are 320 tensor cores which help improve the speed of machine learning applications. The card also has 80 raytracing acceleration cores. NVIDIA has paired 12 GB GDDR6X memory with the GeForce RTX 3080 Ti, which are connected using a 384-bit memory interface. The GPU is operating at a frequency of 1365 MHz, which can be boosted up to 1665 MHz, memory is running at 1188 MHz (19 Gbps effective).Being a dual-slot card, the NVIDIA GeForce RTX 3080 Ti draws power from 1x 12-pin power connector, with power draw rated at 350 W maximum. Display outputs include: 1x HDMI 2.1, 3x DisplayPort 1.4a. GeForce RTX 3080 Ti is connected to the rest of the system using a PCI-Express 4.0 x16 interface. The card’s dimensions are 285 mm x 112 mm x 40 mm, and it features a dual-slot cooling solution. Its price at launch was 1199 US Dollars.
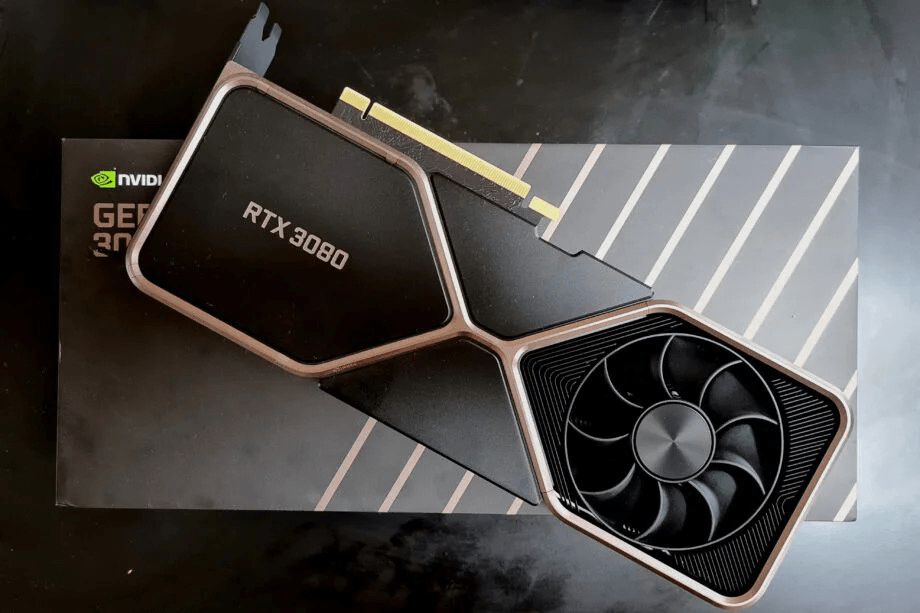
3. NVIDIA GEFORCE RTX 3080
The Nvidia GeForce RTX 3080 is high-end desktop graphics card based on the Ampere generation. It uses the big GA102 chip and offers 8,704 shaders and 10 GB GDDR6X graphics memory.
The gaming performance in 4k is clearly better than the old GeForce RTX 2080 Ti (approximately 15% faster). Therefore, even demanding games should run with maximum detail settings in 4k. Enabling raytracing will however reduce the framerate and therefore maximum details won’t be playable.
The RTX3080 is produced in 8nm at Samsung and rated at 320 Watt but the power efficiency is still quite good.
4. AMD RADEAON RX 6800XT
The Radeon RX 6800 XT is a high-end graphics card by AMD, launched on October 28th, 2020. Built on the 7 nm process, and based on the Navi 21 graphics processor, in its Navi 21 XT variant, the card supports DirectX 12 Ultimate. This ensures that all modern games will run on Radeon RX 6800 XT. Additionally, the DirectX 12 Ultimate capability guarantees support for hardware-raytracing, variable-rate shading and more, in upcoming video games. The Navi 21 graphics processor is a large chip with a die area of 520 mm² and 26,800 million transistors. Unlike the fully unlocked Radeon RX 6950 XT, which uses the same GPU but has all 5120 shaders enabled, AMD has disabled some shading units on the Radeon RX 6800 XT to reach the product’s target shader count. It features 4608 shading units, 288 texture mapping units, and 128 ROPs. The card also has 72 raytracing acceleration cores. AMD has paired 16 GB GDDR6 memory with the Radeon RX 6800 XT, which are connected using a 256-bit memory interface. The GPU is operating at a frequency of 1825 MHz, which can be boosted up to 2250 MHz, memory is running at 2000 MHz (16 Gbps effective).Being a dual-slot card, the AMD Radeon RX 6800 XT draws power from 2x 8-pin power connectors, with power draw rated at 300 W maximum. Display outputs include: 1x HDMI 2.1, 2x DisplayPort 1.4a, 1x USB Type-C. Radeon RX 6800 XT is connected to the rest of the system using a PCI-Express 4.0 x16 interface. The card’s dimensions are 267 mm x 120 mm x 50 mm, and it features a dual-slot cooling solution. Its price at launch was 649 US Dollars.
5. NVIDIA GEFORCE RTX 3070
Being a dual-slot card, the NVIDIA GeForce RTX 3070 draws power from 1x 12-pin power connector, with power draw rated at 220 W maximum. Display outputs include: 1x HDMI 2.1, 3x DisplayPort 1.4a. GeForce RTX 3070 is connected to the rest of the system using a PCI-Express 4.0 x16 interface. The card measures 242 mm in length, 112 mm in width, and features a dual-slot cooling solution. Its price at launch was 499 US Dollars.
The GeForce RTX 3070 is a high-end graphics card by NVIDIA, launched on September 1st, 2020. Built on the 8 nm process, and based on the GA104 graphics processor, in its GA104-300-A1 variant, the card supports DirectX 12 Ultimate. This ensures that all modern games will run on GeForce RTX 3070. Additionally, the DirectX 12 Ultimate capability guarantees support for hardware-raytracing, variable-rate shading and more, in upcoming video games. The GA104 graphics processor is a large chip with a die area of 392 mm² and 17,400 million transistors. Unlike the fully unlocked GeForce RTX 3070 Ti, which uses the same GPU but has all 6144 shaders enabled, NVIDIA has disabled some shading units on the GeForce RTX 3070 to reach the product’s target shader count. It features 5888 shading units, 184 texture mapping units, and 96 ROPs. Also included are 184 tensor cores which help improve the speed of machine learning applications. The card also has 46 raytracing acceleration cores. NVIDIA has paired 8 GB GDDR6 memory with the GeForce RTX 3070, which are connected using a 256-bit memory interface. The GPU is operating at a frequency of 1500 MHz, which can be boosted up to 1725 MHz, memory is running at 1750 MHz (14 Gbps effective).
The AMD Radeon RX 6600 is a best mid range graphics card that is based on the RDNA 2 architecture and uses the Navi 23 chip. It offers 1,792 shaders and 8 GB GDDR6 VRAM with a 128 bit memory interface (14 Gbps, 224 GB/s max).
The RDNA2 architecture offers new features like SAM (Smart Access Memory) and Infinity Cache. PCIe 4.0, RIS (Radeon Image Sharpener) and Raytracing support are also included in the RX6600.
2. NVIDIA RTX 3050
The GeForce RTX 3050 is one of Nvidia’s latest desktop GPUs. Unlike the premium RTX 3090, the RTX 3050 is a moderately specced and moderately priced entry-level GPU.
In a world where people are clamoring to get their hands on cards like the RTX 3080ti and RTX 3090, the RTX 3050 is somewhat of an oddity. A card specializing in 1080p/60fps gaming isn’t something most hardcore PC gamers want in 2022. Sure, ray tracing is a great addition, as is DLSS and Nvidia G-sync, but outside of those features, the card isn’t all that impressive on paper.
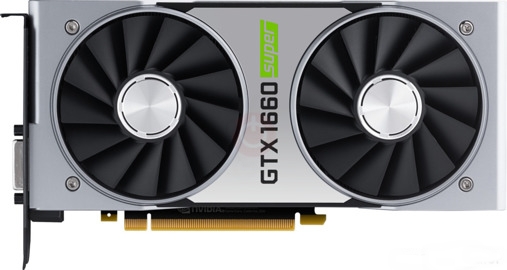
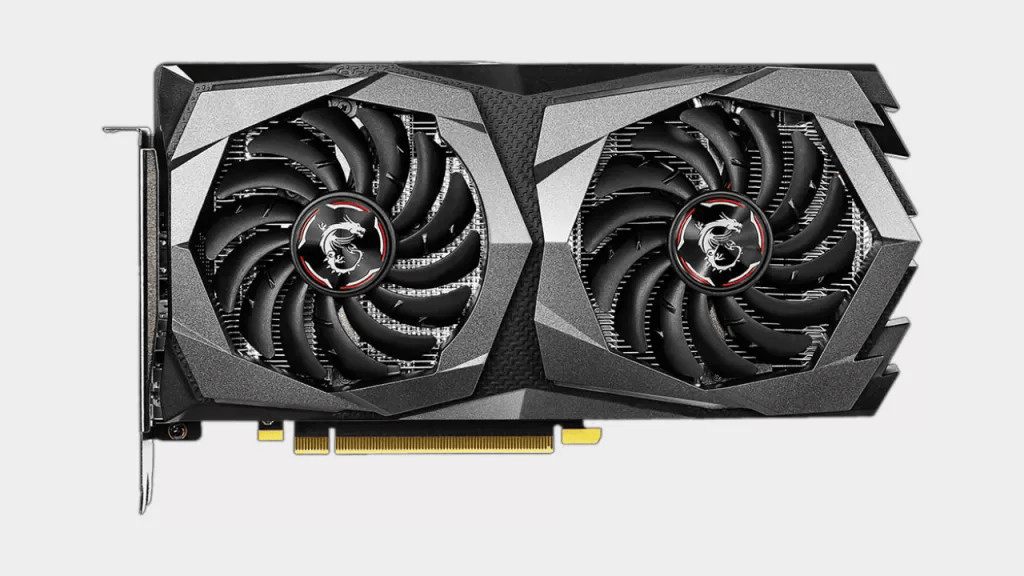
3. NVIDIA GTX 1660 SUPER
The Nvidia GeForce GTX 1660 Super is a powerful mid tier GPU. The GTX 1660 Super is based on the TU116 chip with 1,408 shader units, 48 ROPs, 88 TMUs and a 192-bit-wide memory bus (GDDR6 clocked at 7 GHz, effectively 14 GHz, bandwidth: up to 336 GB/s).The TU116 chip and other Turing-based GPUs are produced using the 12-nm manufacturing process. However, the GeForce GTX 1660 does not offer the latest features such as DLSS (Deep Learning Super Sampling) and Real Time Ray Tracing. Nevertheless, there are some architectural improvements when it comes to floating point and integer performance. These operations can now be carried out simultaneously.
4. AMD RX 6500XT
The Radeon RX 6500 XT is a performance-segment graphics card by AMD, launched on January 19th, 2022. Built on the 6 nm process, and based on the Navi 24 graphics processor, in its Navi 24 XT variant, the card supports DirectX 12 Ultimate. This ensures that all modern games will run on Radeon RX 6500 XT. The Navi 24 graphics processor is an average sized chip with a die area of 107 mm² and 5,400 million transistors. It features 1024 shading units, 64 texture mapping units, and 32 ROPs. The card also has 16 raytracing acceleration cores. AMD has paired 4 GB GDDR6 memory with the Radeon RX 6500 XT, which are connected using a 64-bit memory interface. The GPU is operating at a frequency of 2310 MHz, which can be boosted up to 2815 MHz, memory is running at 2248 MHz (18 Gbps effective).
5. NVIDIA GTX 1650
The GeForce GTX 1650 is a mid-range graphics card by NVIDIA, launched on April 23rd, 2019. Built on the 12 nm process, and based on the TU117 graphics processor, in its TU117-300-A1 variant, the card supports DirectX 12. This ensures that all modern games will run on GeForce GTX 1650. The TU117 graphics processor is an average sized chip with a die area of 200 mm² and 4,700 million transistors. It features 896 shading units, 56 texture mapping units, and 32 ROPs. NVIDIA has paired 4 GB GDDR5 memory with the GeForce GTX 1650, which are connected using a 128-bit memory interface. The GPU is operating at a frequency of 1485 MHz, which can be boosted up to 1665 MHz, memory is running at 2001 MHz (8 Gbps effective).
This graphic card’s list is sorted from the high to low specification.
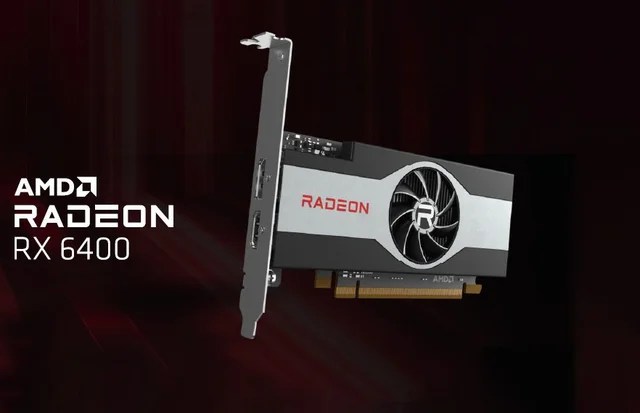
1. AMD RADEON RX 6400
AMD Radeon RX 6400 mid-range GPU for desktop has been launched. The graphics card comes with AMD’s Smart Access Memory technology that is claimed to give a performance boost in gaming. It is aimed at those who seek a compact offering to fit in a small-sized PC. As per a report, the AMD Radeon RX 6400 GPU has been launched with partners including ASRock, Biostar, Gigabyte, MSI, PowerColor, Sapphire, and XFX. The unit has a maximum graphics memory size of 4GB, and has a base frequency of 2039MHz.
2.NVIDIA QUADRO T600
The Nvidia T600 Laptop GPU (or Quadro T600 for laptops) is a professional mobile graphics card that is based on the Turing architecture (TU117 chip). It is similar to the consumer GTX 1650 with 896 CUDA cores and a 128 Bit memory bus for GDDR6 graphics memory (10 Gbits). The chip is manufactured in 12nm FinFET at TSMC. The T600 was introduced as a refresh together with the T1200 and should be slightly slower than the older Quadro T1000 (2.6 versus 2.5 TFLOPS peak SP performance).
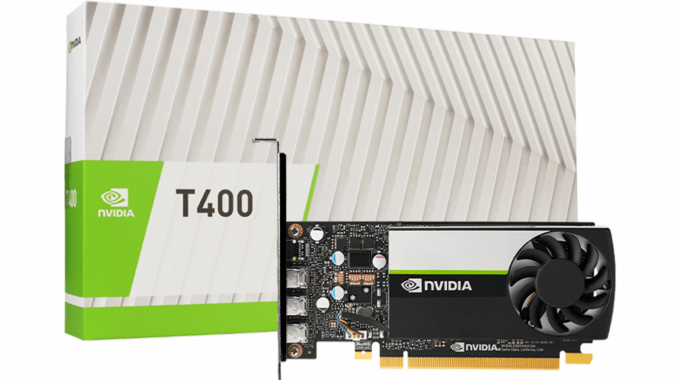
3.NVIDIA QUADRO T400
The T400 is a professional graphics card by NVIDIA, launched on May 6th, 2021. Built on the 12 nm process, and based on the TU117 graphics processor, the card supports DirectX 12. The TU117 graphics processor is an average sized chip with a die area of 200 mm² and 4,700 million transistors. Unlike the fully unlocked GeForce GTX 1650, which uses the same GPU but has all 896 shaders enabled, NVIDIA has disabled some shading units on the T400 to reach the product’s target shader count. It features 384 shading units, 24 texture mapping units, and 16 ROPs. NVIDIA has paired 2,048 MB GDDR6 memory with the T400, which are connected using a 64-bit memory interface. The GPU is operating at a frequency of 420 MHz, which can be boosted up to 1425 MHz, memory is running at 1250 MHz (10 Gbps effective).Being a single-slot card, the NVIDIA T400 does not require any additional power connector, its power draw is rated at 30 W maximum. Display outputs include: 3x mini-DisplayPort 1.4a. T400 is connected to the rest of the system using a PCI-Express 3.0 x16 interface.
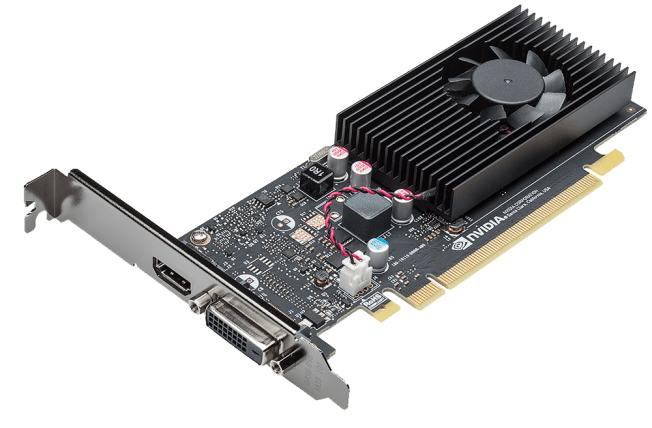
4. GT 1030
The GeForce GT 1030 was an entry-level graphics card by NVIDIA, launched on May 17th, 2017. Built on the 14 nm process, and based on the GP108 graphics processor, in its GP108-300-A1 variant, the card supports DirectX 12. This ensures that all modern games will run on GeForce GT 1030. The GP108 graphics processor is a relatively small chip with a die area of only 74 mm² and 1,800 million transistors. It features 384 shading units, 24 texture mapping units, and 16 ROPs. NVIDIA has paired 2,048 MB GDDR5 memory with the GeForce GT 1030, which are connected using a 64-bit memory interface. The GPU is operating at a frequency of 1228 MHz, which can be boosted up to 1468 MHz, memory is running at 1502 MHz (6 Gbps effective).Being a single-slot card, the NVIDIA GeForce GT 1030 does not require any additional power connector, its power draw is rated at 30 W maximum. Display outputs include: 1x DVI, 1x HDMI 2.0. GeForce GT 1030 is connected to the rest of the system using a PCI-Express 3.0 x4 interface. The card’
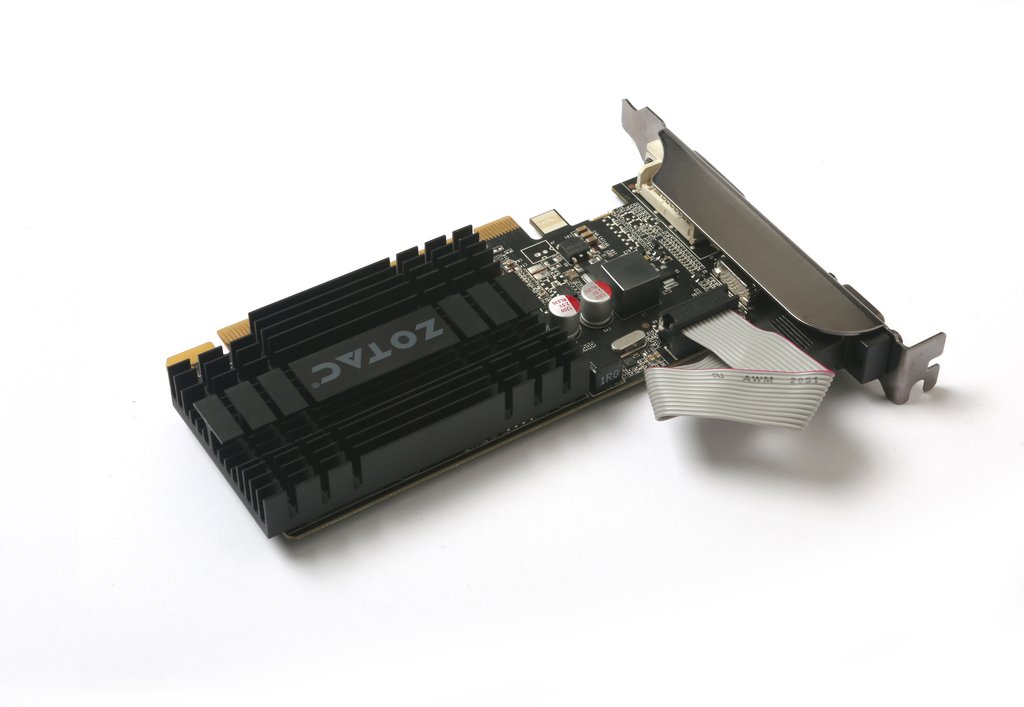
5. GT 710
The Nvidia GeForce GT 710 is an entry-level desktop graphics card based on the old GK208 chip of Kepler architecture. It is manufactured in 28nm by TSMC and can be equipped with a maximum of 2 GB DDR3-VRAM, which is connected via a 64 bit memory bus (24.4 GB/s).The performance is on average slightly below that of the mobile GeForce MX 250 and therefore it is best suited for current games in low – medium detail level.The power consumption is relatively low and, according to Nvidia, specified at 19 Watts.
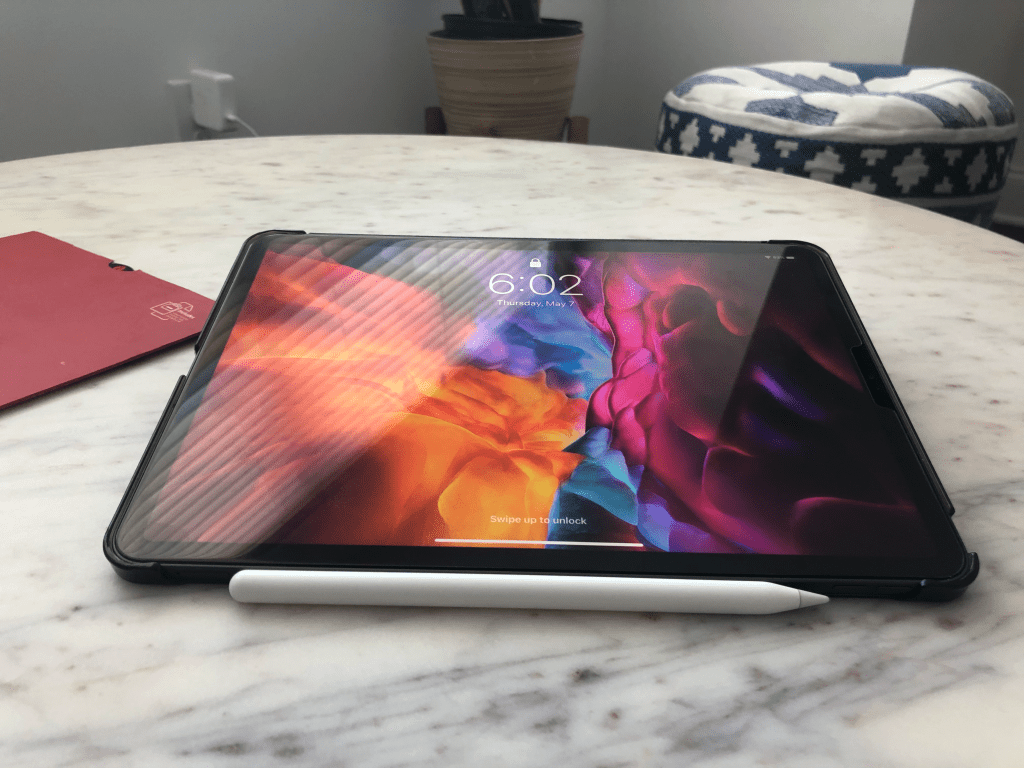
Lets take a look at my 3 piece case combination that complements apple magic keyboard.
Alright, if you follow me on yotube you wold have seen that I got the Apple magic keyboard to complement my new 2020 iPad Pro and make use of Lates iPad OS 14 features and support for trackpad.
Long story short, I truly love it and I use it more than I imagined. It provides a great typing experience and trackpad support to take your iPad experience to next level. But, Magic keyboard cannot be your ONLY case for iPad Pro. And reason for that is, you don’t need to have access to your keyboard all the time. When you are consuming content at that time you don’t need this keyboard And trackpad.
And, if you are like me you need to have a case on your iPad all the time to keep it safe from occasional mishaps or drops. It doesn’t provide protection on the sides and also your Apple Pencil is left vulnerable to accidents.
At that time, at that crucial time you need a dependable case. I already had this case from Dadanism – I covered it in my previous iPad Pro accessories video.
Although, my existing case is great there is one issue with that. It provides all around protective covering but you have to put your iPad in it every time and take it out whenever you want to use your magic keyboard. Which might not sound like a big deal but when you have to do this 5 to 10 times a day, it becomes a hassle.
So, In order to avoid all that inconvenience and make it little more easier, I have found a perfect combination of cases to address all the issues.
Here comes my first case – Coverbuddy – from …. switcheasy.
This case is good. Made of good quality plastic with inner smooth lining. On the first impression it might look like very thin and flimsy but that is the most important feature of this keyboard.
You have to snap your iPad in it and it covers your iPad completely from 3 sides and back. On the bottom there is no protection. But that is fine. It has got precision cut out for volume buttons, as well as power buttons, 4 speakers and microphones .
Also, you can securely place your Apple Pencil on the top For charging when not in use.
These are very common and kind of expected features of any case, but where this coverbuddy differs from othe cases is its compatibility with apple’s magic keyboard. You can directly place it on the magic keyboard and it is Designed to blend seamlessly.
See it has Got these 3 pins that will help connect your magic keyboard and also charge it when plugged to power. It seamlessly blends in with your apple magic keyboard. You can even close it and it will almost fit perfectly. I said almost because, notice it when it is kept like this, keyboard doesn’t shut completely on its own. It is not a big deal at all, just wanted to point that out to you guys… if that is something which would bother you. In all other ways it fits perfectly. and when you are done with your work, just pick your iPad and you are ready to use it for reading or watching videos.
Now, you would be wondering that you are not going to hold the iPad in your hand alt he time. There comes my bonus $8 case (Affiliate Link: https://amzn.to/2V8lHEU) that looks premium and offers you the flexibility to use your iPad with cover buddy. Basically it is the same idea like magic keyboard. It has got magnets on the back that helps to keep your iPad attached to the case. It fits your iPad Pro with coverbuddy case seamlessly. Build quality is great, feels premium in hand with this inner smooth surface to keep your iPad in pristine condition. So, these 3 cases provides great protection to my iPad Pro and at the same time provides a seam less experience of switching between them. Let me know in the comments section what’s is your preferred collection of cases.
DISCLAIMER: This http://www.novasempire.com and description contains affiliate links, which means that if you click on one of the Amazon product links, I’ll receive a small commission.
5 reasons why Sigma 24-70 f2.8 should your first lens for Sony e-mount camera
5- Build Quality
This lens is built like a tank, it’s all metal design feels so good in hand. All the functions and buttons it has got are comparable to Sony Gmaster lens. This zoom ring is great and you can lock it too. I found the dampness is perfect too for focus ring.
Outside build quality just half the story, I am sure the internal glass components are great too because picture quality is crisp and sharp. That brings us to our 4th reason.
4- Picture Quality
I have been using this lens for more than a month now and I found that the picture quality is great – I also have Sony 16-35mm Gmaster lens and I cannot see the difference between their picture quality – sharpness and vibrancy of picture is at par with Sony.
3- focal range on the wider side 24is just enough wide and 70 is just enough telephoto
24-70 is a perfect focal length, it gives great flexibility with f2.8 aperture – its a fast lens and amount of light you can get under low light situations is amazing. It can replace all you prime lenses from 24mm to almost 85mm. And f you just want to buy one lens this should be your lens because it can handle most of the situations.
Obviously, if you have a specific use like sports photography, then you will have to go for 100 to 400mm lens or 12-24mm super wide lens for real estate photography.
But in all other Norma scenarios this lens will handle everything.
2- That bokeh – if you are not aware of that term bokeh or bokah – that background blur you get is called as bokeh – it keeps your subject in focus with background blur
Obviously you will get even creamier bokeh from fast 1.4 prime lens but this is perfect too…
1 – And finally – the price – Let me tell you one thing, I am using 16-35 Gmaster lens and build quality wise – picture sharpness wise – Altus focus capabilities wise it is second to none
It is the perfect companion for your Sony full frame e mount camera. I upgraded to Sony a73 recently and looked at all the reviews about this lens and other lenses – literally all the reviews – and bought this a month ago and fell in love with it from the first moment.
Now that I have told you 5 reasons why you should buy this lens, let me tell one reason why you should not buy this lens. And that is the reason I am returning this lens – let me give my use case.
I am basically a YouTube content creator first and then and avid photographer. Based on my use case I find that I like to use wide angle lens and prefer wide focal lengths.
This lens although was great, I needed another wider lens. So, I bought Sony Gmaster used locally and that is amazing too…
and the both my lenses are heavy.
And I need a lens that would be light weight foe travel purpose. Because taking both these lens are not going to be comfortable- So I have decided to downgrade in terms of build quality to Tamron lens which is also great and sharp.
So the reason you should avoid this lens is that it is heavy – and that is obviously due to the material and if I would not have bought Gmaster I would definitely keep this.
Hopefully this will help you in making the buying decision and if you found this video helpful – please share this article with your friends who are looking to get one and please watch the full review on my youtube channel “Incremental Nova”.
See you in the next one and don’t forget to exercise today.
As a MAC OS user and a full-time software developer I have listed down 5 must know tips and tricks – this will not only make you a better software engineer but also save you lot of time. And make sure to stick to end of the video where I will show you one bonus tip that you cannot afford to miss. So with out wasting any time – lets go straight to tip number 1
1. open . → in terminal – there are so many times when I am doing something on my terminal and wants to open finder to check the files and open them in text editors etc… Well this command is going to save you lot of time and will make your life easy… just type … and it will open the current directory in finder
and open <filename> to open the file.
2. install :
Every developer utilizes Command Line Tools. A simple terminal command will allow you to download these. It will ask you to confirm after you have entered the command.
xcode-select –install
3. Show hidden files (dot files)
As a developer you need see hidden files that can help in setting up configurations etc.
Enter this into Terminal (warning: it’s going to restart your Finder):defaults write com.apple.finder AppleShowAllFiles TRUE; killall Finder;
To restore default behavior:defaults write com.apple.finder AppleShowAllFiles FALSE; killall Finder;
4. Drop Files onto the Dock to Open in an App : Open iJ Test Java project open file in findr and drop on VS COde or IJ to see and run
5. Go to any folder in Finder : With the Finder active hit command-shift-g and you’ll get a Go to folder: window. Just put “~/Library/” (no quotes)
BONUS TIP: Terminal Tricks—Purge
purge forces apps to release RAM they might be holding on to (that they don’t need)
Ipad Pro 2020 tempered glass vs paperlike screen protector
Biggest misconception that people have about screen protectors is that they are used by only 2 kinds of people.
• First one, that it is only used by pros for artistic work in that case something like paperlike which makes writing on ipad screen , like you are writing on actual real paper.
• Second category of people are not artists and pros and wont be drawing or sketching on their iPads. So, they go for glass screen protectors beacuse they just want something that will protect the screen from daily scuffs and use.
However, there is third category, like me who are not pros but use their device for taking notes, editing photos and videos and also use them for media consumption.
Good evening everyone on this fine evening. Welcome back for another blog. If you are here for the first time “Welcome” it is lovely to have you. My name is Navi and I like to express my views about investing and tech. If you like any of these topics or like be both of them then please subscribe for continued engagement.
“Today I am going to tell you why I changed screen protector on MY IPAD PRO 2020 11 inch model”.
If you have found the perfect screen protector for your device then congratulations. However, if you are on the fence like most of the people, like I was, this video will help you to undersatnd pros and cons of different types on screen protectors and will help you to make the decision on which one you want.
For those of you who are wondering what screen protector I already have on and why am I getting the other one.
So, currently I have got “Glass screen protector” from brand name “Ozero” they are pretty inexpensive, good quality and easy to install.
**Sad music in background ** I have not recorded the video of installing that one because I never thought I would change it and will make a write a blog or create a video about it.
I installed it as soon as I bought my iPad in April, and have been using it for little over a month now. My thought process behind getting a glass screen protector rather than a matte finish one was that I will only use it for taking notes and I thought I will not mind writing on glass screen. Moreover, it will provide great protection because apple products tend to get lot of small scratches over time. My last iPad had lot of these small scratches or scuffs.
Although it did provide me with great picture clarity, I noticed quickly that I am getting lot of light reflection. I tried to still ignore it for very long time but I got annoyed with it as I am working from home nowadays and my work desk gets lots of natural light. Even while reading outdoors it was not a pleasant experience.
Ok, at this point lets recap things that made me change my my mind.
1. Screen reflection
Reflection and finger prints
Reflection during daytime
2. Difficulty in reading
3. Writing on glass surface
There are few other issues as well like too much… I really mean too much fingerprint marks but I don’t consider that to be a deal breaker. So, I began my search for a perfect screen protector that will overcome these shortcomings.
I read and saw lot of reviews online. I think it is good time to mention that I purchased both the products with MY OWN MONEY and they are not sponsored in any way.
There were few options, one that I guess you all know by now ; Paperlike – It is all over the internet.
It is pretty expensive for screen protector and I couldn’t justify paying something like $34 for it. Moreover, there are some pretty bad reviews I read on reddit.
So, I went with budget options and decided to get iCarez paperlike screen protector. I think it was like 8 bucks on amazon ( https://amzn.to/3631OQy ). I took out the old Orzero glass screen protector and put this icarez matt finish screen protector. I will fast forward the video as you can see how I installed it. It was not crazy difficult to install but requires way more efforts than the glass one.
First thing I noticed which I liked was – No more screen reflection, Way way better than the glass one. It does feel like you are writing on paper because of sound it produces when you write on it but not actually like writing on paper. But still better than the glass one. Reading indoors and outdoor is like charm, I love it so much that I have actually started using it for reading more.
So, it did overcome the issues I was facing with glass protector but it came with one disadvantage. You will notice like grainy texture on your screen, defiantly brightness is slightly lower and screen clarity has some of that texture.
But, I knew this beforehand and it doesn’t affect me that much. Advantages over weigh the disadvantage it has for me.
So, if you find this blog useful in anyway, please go ahead and like it. Please consider subscribing for more content like this.
Dont forget to mention in comments which one you purchased and why ?
You will find a video review on the same topic in the description below for more detailed analysis.
DISCLAIMER: This blog post contains affiliate links, which means that if you click on one of the Amazon product links, I’ll receive a small commission.
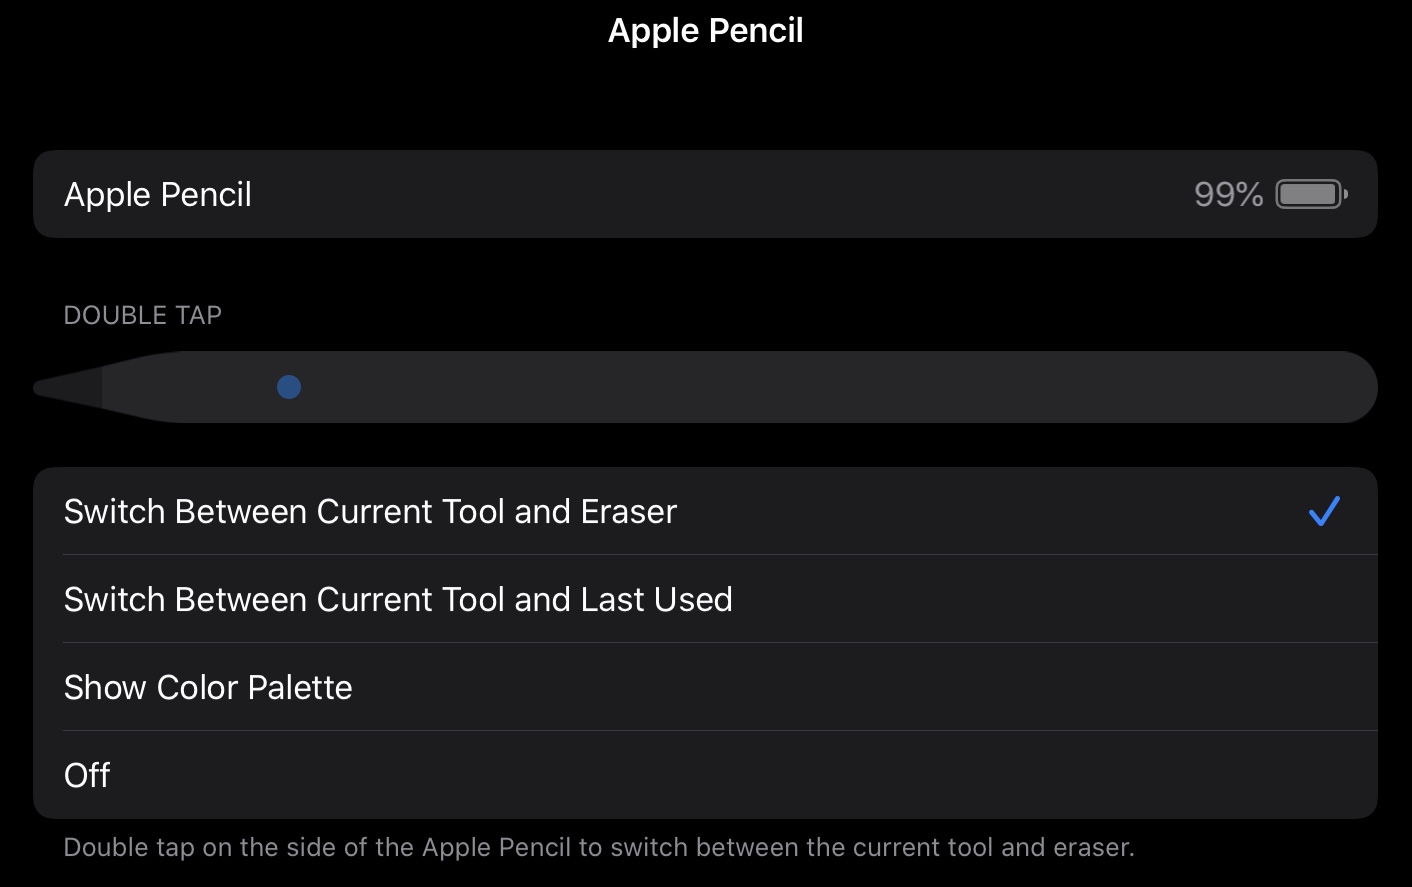
1. First thing to do is to change and customize double tap setting:
2. Instant note :
If you are some one who uses notes app then I am sure you are going to love it. When your iPad is in sleep mode, just double tap on the screen and instantly notes app with new note will be ready for you to take quick notes.
3. Sign a document:
I find this feature so handy. You can just open the Notes App and tap on camera logo, scan a document. Once you have the document you can double tab your pencil to bring o edit mode and start signing the document .
4. Create straight lines:
In the Notes app you can tap on the bottom right pencil icon and then select ruler to use it to draw straight lines.
5. Check battery life:
You can check battery life in 2 ways a) by snapping your pencil on the iPad b) In the today view just edit and add battery widget and it will show you battery life of all connected devices.